Tuesday, June 14, 2011

The Portrait Sisters are Finished!

Stephanie & Jocelyn are finally finished!  It has taken awhile to get them done in between all of the other things I had going on! 

JOCELYN


STEPHANIE


In the future when I create portrait dolls I will only be doing them in polymer clay.  It is very difficult to do the dolls in porcelain.  It is unforgiving.  You cannot go back and change anything in the sculpture once it is fired.  I see things I would change now, but I cannot.  All in all they are cute little girls that stand between 3" & 4" tall.  Very tiny girls!


Pin It

Saturday, June 4, 2011

♥ Portrait Sisters ♥ Collar, Cuffs & Fun Stuff!

Now the costuming get to be a bit fun.  I love the small details as they add realism to the tiny dolls.


Materials:
  • Fine White  Cotton Fabric
  • Wonder Under Fusible Webbing
  • Aileen's Tacky Glue
  • Sharp Scissors
  • Red Silk Ribbon & Silk Cord
  • Hard lead pencil
  • Needle Tool
I had to hand dye the silk cord trim & silk ribbon as I didn't have any in red.  I also dyed some antique trim but as you can see in the photo, it came out a muted shade of red.  It will be perfect for another project, but not this one.


I used Jacquard Acid Dye, it is perfect for silk and feathers. You can see my Feather Dying Tutorial here: Feather Dying Tutorial

Following the directions for the fusible webbing, fuse 2 pieces of fine cotton batiste together.  This will add rigidity to the fabric as well as keep it from fraying.  Do not skip this step.

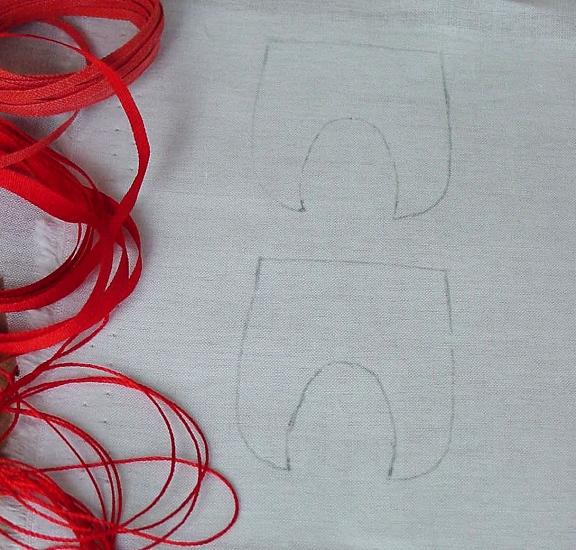
In this next photo you can see how to trace around the pattern with a hard lead pencil


Carefully cut around the pencil lines as smoothly as possible.  Be sure to cut inside the lines so there won't be any pencil marks on the actual collar.  Sharp scissors are a must!

Here you can see the cut out collar.  Notice the smooth clean edges and no pencil marks. Because the fabric has been fused together it will not fray.  Super helpful in maintaining  a clean and flat look that will add to the realism of this small scale.

*DON"T throw away the piece that you cut from the center of the collar, it is perfect for making the inset yoke under the collar.


Using the Tacky Glue and a needle tool, carefully apply a very thin bead of glue to the outside edge of the collar only!  Slowly lay the red silk cording on the glue along the edge.  Try to keep it as straight as possible.  Repeat this on the edges for a second row of red trim trying to keep the cord equally spaced on all sides.  Add 2 rows of red silk cording to the top of the yoke as well.  When the collar is dry, you will want to turn the neck edge under so there are no raw seams visible.

Now the magic really starts to happen!  I love this part!
Carefully glue the yoke to the open "V" area of the neckline.  Notice how nicely the fusible webbing keeps the edges clean and from fraying.


Ahhhh!  Look at little Jocelyn now!  She is really coming to life!  Red silk ribbon is tied in a tiny knot and added to the bottom of the collar in the front.  You can see how neat and clean the collar is on the top side as well as underneath!


You can see that tiny matching cuffs have been added to the edges of the puff sleeves.  This was done by cutting long this strips of fused fabric and adding the 2 red stripes of red silk cord.  I used the photos of the girls as my guide in how they should look.
NEXT:  The girls will get their socks & shoes and final hair styling & hair decorations and be off to their new home!
Pin It

Friday, June 3, 2011

♥ Portrait Sisters ♥ - Almost Dressed!

Here are Stephanie & Jocelyn  Almost dressed.

They still need their fancy red trimmed collars and cuffs as well as knee socks and leather Mary Jane's.  The poor girls will also need their hair combed out and restyled.


I had to make some alterations to the original pattern. When working is such a small scale, sometimes illusion wins out over reality and different techniques must be used to keep things n scale.  The original dresses are very simple and translate to a rather plain finished dress in miniature.  I decided to add some small gathers to give the skirt a nice shape without bulk rather than add the original "tucks" that were eased into the skirt to fit the bodice.  The dress hangs nicely with a nice soft look to the folds rather than looking stiff like it did with the original drafted pattern.
Pin It

Thursday, June 2, 2011

♥ Portrait Sisters ♥ - Cutting Out The Dress!

Now it is time to use the patterns and cut them from fabric.
You will need:
  • Aileen's "STOP Fray" or "Tacky Glue"
  • Needle Tool
  • Extra Sharp Scissors
  • Hot iron to press fabric
  • Hard lead pencil 


The Fabric Parts above  have each been carefully sealed with Aileen's "Stop Fray"
  1. Be sure to press your fabric so it is perfectly smooth and wrinkle free
  2. Use a hard lead pencil to carefully trace around the pattern onto the wrong side of the fabric.
  3. You can double or quadruple the layers of fabric if you need to cut out more than one piece of the same pattern. This way you are only cutting it out one time.
  4. Use VERY sharp scissors to carefully cut just inside the line of fabric.  This is done to keep any pencil lines off of the cut out pieces.
  5. Use Aileen's "STOP Fray" or Tacky Glue to seal the edges of each piece.  I use a needle tool dipped in the product and go around each edge very carefully. 
  6. Lay the sealed pieces on wax paper to dry.
  7. Don't skip this step.  It is super important if you want to have a very neat & clean finished costume.

Pin It

Wednesday, June 1, 2011

♥ Portrait Sisters♥ Costuming - Drafting The Dress Pattern

Stephanie Gets Her Sailor Dress!

The first step is to make a simple pattern for the sailor dress.  I use normal paper to make the initial pattern and then transfer it to card stock to make it sturdy and easy to trace around.

I start by studying the dress in the photo. It is a simple classic & timeless sailor type dress.  It consists of a yoke, slight puff sleeves, a collar & flare skirt that according to the customer is above the knee.  There will also be embellishments of white cuffs on the sleeves, a white insert in the yoke and a red "tie' and red trim.  The Collar will also be white trimmed in red.

You can either lay the doll down on paper and trace around her to get an approximate size and shape of the pattern or you can fold a small piece of paper in half and just "eyeball" the pattern.
I initially make the pattern without the seam allowances and add them in later in the final draft.  You can see in the photo that the length is also longer than needed, but that is not important at this time.


Here you can see that I have altered the pattern to fit Stephanie.  I lowered the "V" in the neckline and added the seam allowances I think I will need.


I have come up with basic patterns for the dress that I think will work.
Pictured from Left to Right:
Bodice back, Bodice front, Collar, Skirt & Sleeve.


Pin It